The Ultimate Mautic Setup Guide
As an open-source project, Mautic offers a fresh option for small businesses (and large enterprises) looking to get into marketing automation.
We’ve written at length about how open-source makes marketing automation better. The solution is flexible, affordable and backed by a passionate community that strives to make Mautic the best marketing automation solution out there.
The most valuable benefit of Mautic, however, may very well be that passionate community — forums and a Slack Team full of members asking questions and helping each other. If you don’t know how to do something, there’s likely someone willing to help.
As proud members of the Mautic community, we wanted to give back by compiling a comprehensive list of our own learnings and best practices within Mautic.
We hope for this to blossom into The Ultimate Mautic Setup Guide, and we’re excited to share it with you.
DISCLAIMER: Since this is the ultimate guide, the article is very length. If you'd like some help with Mautic so you can stop wasting time, go ahead and fill out the form below for a quick chat. We're here to help.
Quick Jump to Each Section
- Installation
- Setting Up Amazon SES
- AWS IAM Credentials
- AWS SES Email Configuration with Postfix
- Email Configuration
- Email List Management
- Segment Management
- Updating Campaigns
- Transactional / Marketing Emails
Trouble with Mautic? We Can Help. Schedule a Free Consultation.
Almost Everything You Need to Know About Setting Up Mautic
This checklist is by no means exhaustive, and we will constantly update portions of this guide as we learn more about working with Mautic, and as new features are developed.
At the same time, we encourage the community to contribute to this ultimate guide just as much as we do. If you have something to add, throw it in the comments for discussion, and we’ll add it to the guide.
The more tips and tricks we can share with the community, the better this product becomes for all of us.
Installation
For basic installation instructions, it’s best to consult the steps in the Mautic documentation.
The getting started section takes you through 4 steps:
- Installing Mautic
- Adding Cron Jobs
- Downloading the IP lookup service database
- Installing the Tracking Javascript
While these will set you up with a basic working installation of Mautic, there are a few things to consider and make sure you do during the installation process.
Make Sure Your Mautic Instance is Git Managed
Managing your Mautic instance with version control is important to:
- Maintain a working history of code changes on your site.
- Easily update or rollback changes to your site without restoring full backups from a tar or zip file.
- Easily merge in bug fixes if they are available in specific pull requests or branches on GitHub ahead of the next minor release.
- Better understand what changes are contained in the different minor version updates within Mautic.
If you’re working with Git for the first time, you may want to check out GitHub’s Guide to Forking Projects. It is a great primer for you covering the basics of managing your site with Git.
Make sure you have an up to date version of Mautic on the master branch when you start by forking the main Mautic project.
Make Sure Your Mautic Site is HTTPS Secured
In order to secure your site with HTTPS, first you will need to secure an SSL certificate and install it on your web host. Once installed, configure your Mautic instance:
- Set an HTTPS site URL in “Configuration > System Settings > Site URL”
- Set “Cookie as Secure” to be toggled “ON”
If you haven’t yet heard, the web is in the middle of a huge migration to secure the web with HTTPS. As the custodian and owner of a marketing automation tool with personally identifiable information of your customers, it is paramount you secure customer’s information and prevent it from leaking out to prying parties.
Setup Cron Jobs as a WWW User
Cron jobs are readily available in Mautic’s Cron Jobs documentation. When setting up the cron jobs, it is important the cron user matches the same user who is the owner of the mautic instance.
Examples of web users:
- Ubuntu: www-data
- CentOS: apache
- Bitnami: bitnami
- Plesk: <custom>
- Cpanel: <custom>
In hosting configurations on Ubuntu and CentOS, you will find the mautic instance is running under a standard name such as www-data, apache. Often times you cannot su into this user to set up the cron job. If you run into this issue, you may want to set up the cron jobs as root, and assign the cron job to run as a specific user. For example:
$ sudo -s

$ vim /etc/crontab

--

0,15,30,45 *  * * * www-data /usr/bin/php /var/www/html/mautic/app/console mautic:segments:update --env=prod > /dev/null

--
The important part to note here is www-data is added before /usr/bin/php. This directs the crontab to run as www-data user on each run.
Setting Up Amazon SES
Create an SES Account and Note the Region (US-West, US-East, etc.)
The region will be selected in the upper right hand corner while logged-in to your SES console.
Configure DNS Settings for Your Domain (Add CNAME and TXT Records)
When tackling this step, make sure you:
- Configure DKIM on the domain, not on the individual email addresses — this way all emails can be added for that domain
- Test the configuration by running something like: dig abcdefghijklmnopqrstuvwxyz1234567890._domainkey.hello.facetinteractive.com
- Verify the domain
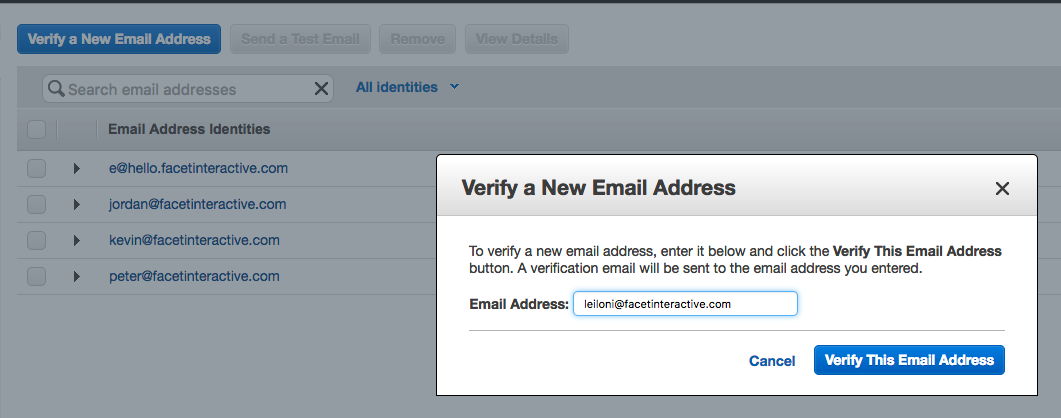
Add Email Addresses in Amazon SES
- Browse to Email Addresses in SES (under Identity Management)
- Select Verify a New Email Address and enter the email address in the modal
- You will receive an email with your verification link within 1 hour. Make sure to click it!
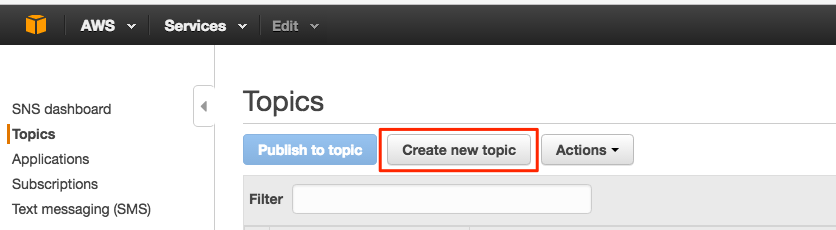
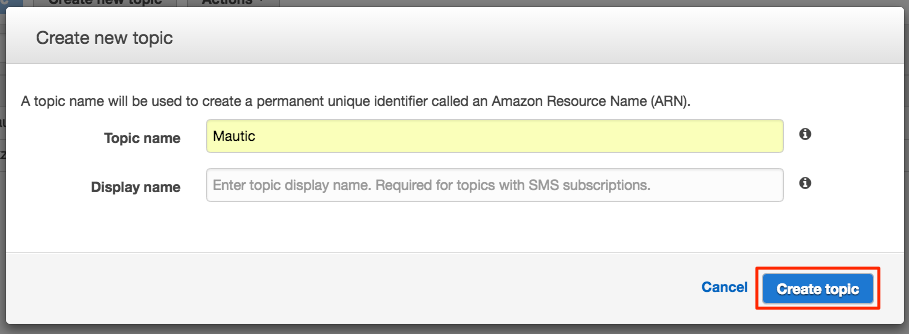
Create an SNS Topic for Bounces Monitored in Mautic
Setting up bounce management with Amazon SES in Mautic is pretty straightforward. Directly from the Mautic documentation page, here’s how you do it:
- Go to the Amazon Simple Notification Service (SNS) and create a new topic
- Click on the newly created topic to create a subscriber
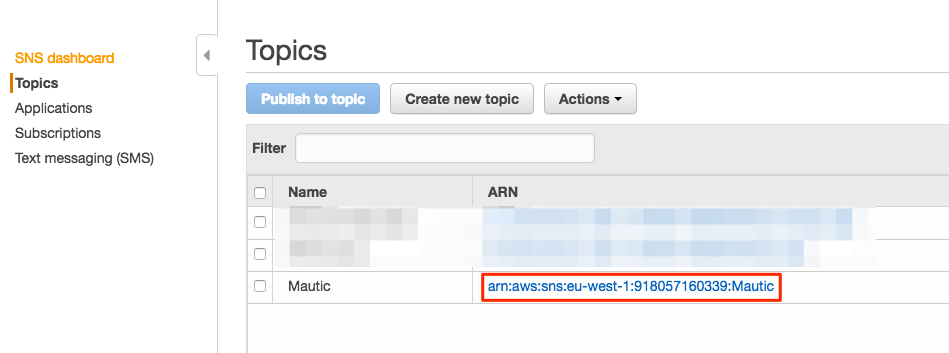
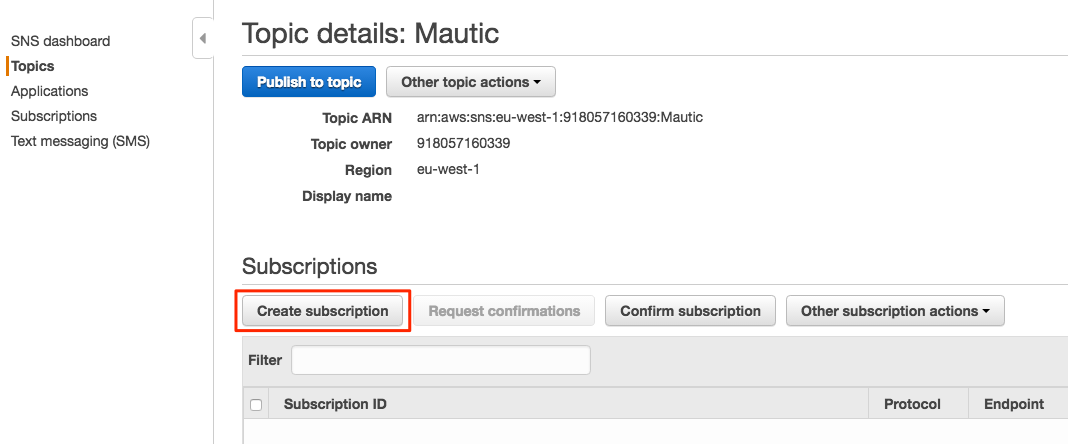
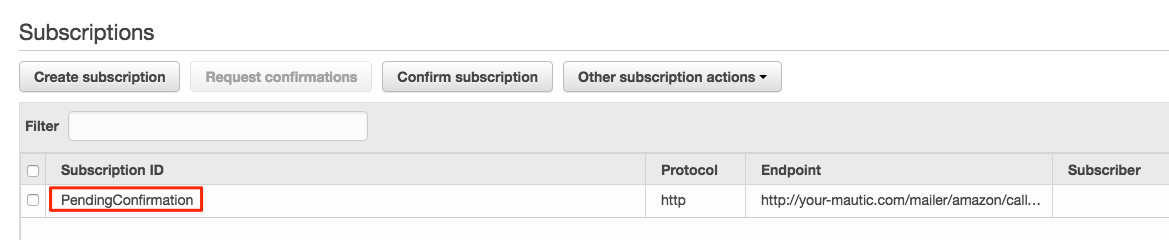
- Enter the url to the Amazon webhook on your Mautic installation
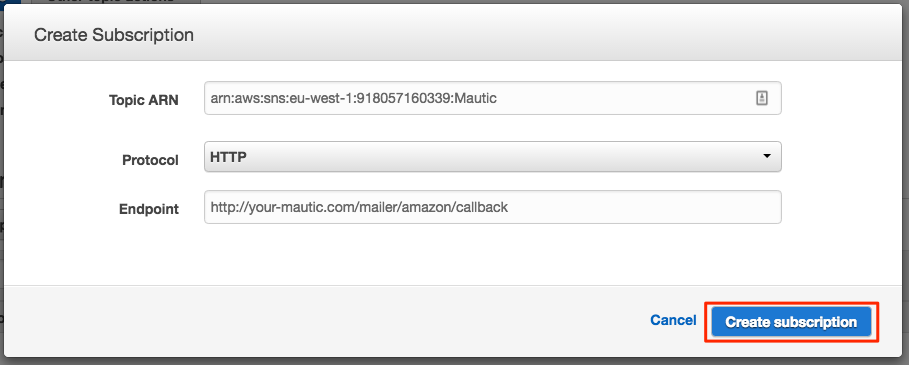
- The subscriber will be in the pending state until it is confirmed. AWS will call your Amazon webhook with a Subscription Confirmation request including a callback url. To confirm, Mautic will send a request back to this callback url to validate the subscription. Therefore, make sure your Mautic installation is allowed to connect to the internet, otherwise the subscription will remain in the pending state and won't work. Check the logfile for more information.
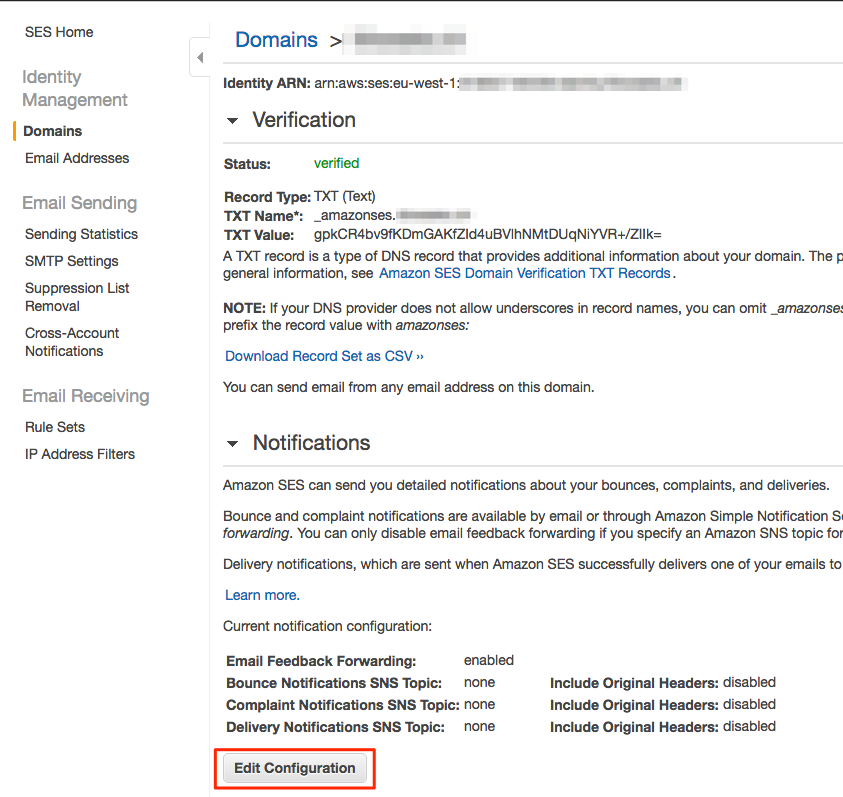
- The last step is to configure Amazon SES to deliver bounce and complaint messages using our SNS topic.
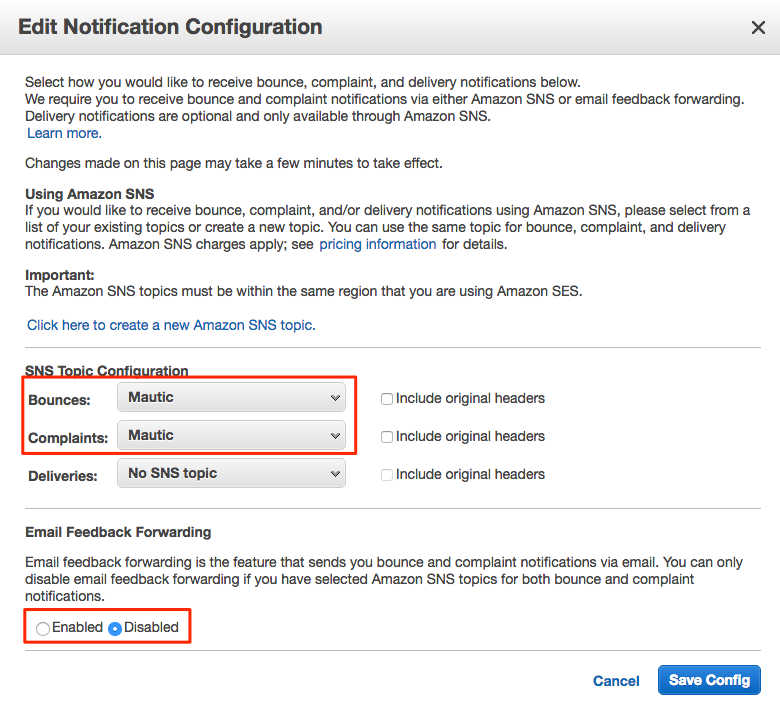
Create an SNS Subscription for Complaints Monitored in Mautic
Use the same process above to make a Complaint SNS Topic.
Request the SES Account to be Removed from Sandbox and Put Into Production
From your SES Account > Statistics Dashboard, you can request an increase in your sending volume. This will pull your account out of sandbox mode.
- Go to SES > Sending Statistics
- On the right hand side under Additional Information, select Request Increased Sending Limits, or just go here: http://aws.amazon.com/ses/extendedaccessrequest/
It’s a simple step, which makes it an easy one to forget. Make sure this is done, and you will avoid unnecessary headaches later when you can’t figure out why your emails won’t send.
AWS IAM Credentials
Create an IAM User and Authorize it for SES Sending
- Amazon makes this easy, all you need to do is browse to SES Management Console > SMTP Settings
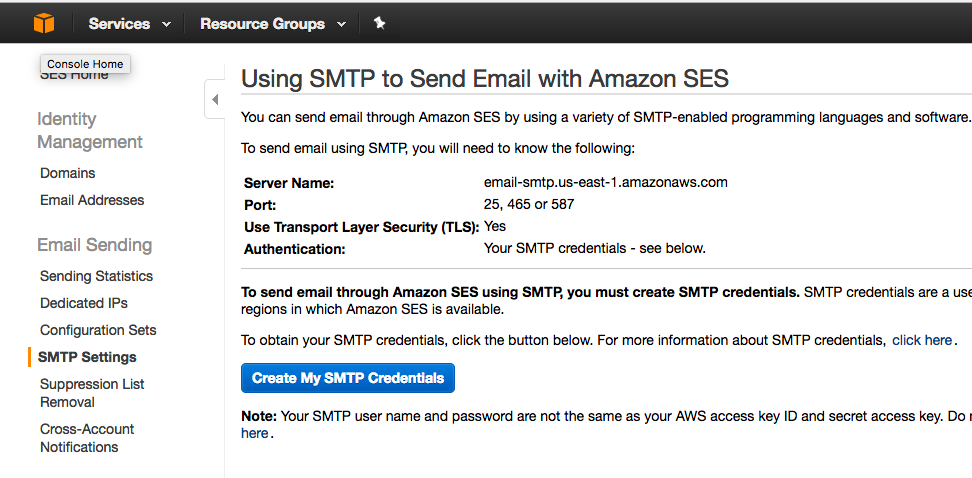
- You can then hit Create My SMTP Credentials
- Which will pre-populate your IAM user creation form
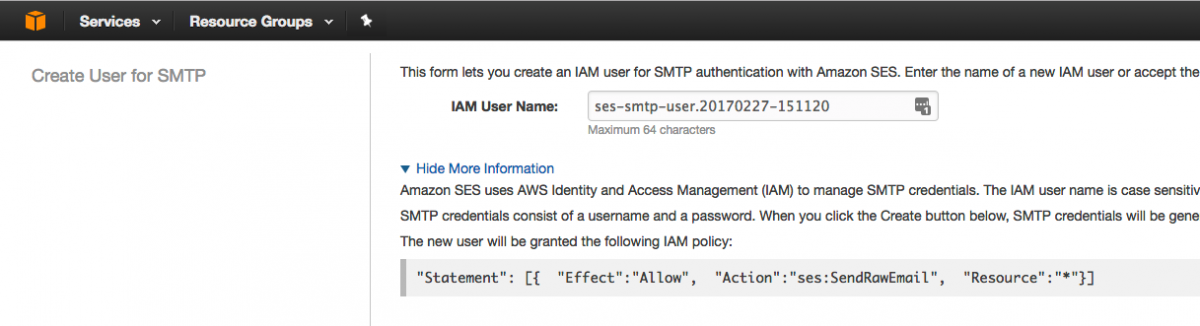
Then make sure to Save your resulting Credentials, this is your SMTP Username and SMTP Password.

(Don’t worry, this demo IAM user has been deleted!)
AWS SES Email Configuration with Postfix
To achieve email sends at a rate greater than the SES limit of 50 emails per second, you can set up your local email with Postfix. This will allow you to send emails through the SES API.
Configure Postfix
Go to this resource for a step-by-step guide on how to do this.
Add Your Email SMTP Configuration
This should be set up as “Other SMTP” provider with a host: localhost:25.
Add Your SES IAM Username and Password in “Email User” and “Password”
Email Configuration
Setup Email for Sending Emails (SES Credentials)
For this you’ll need your Access and Secret Keys which you created above:
- AWS Secret Key
- AWS Access Key ID
- AWS Region (West, East, etc.)
Setup Email for Monitoring (IMAP Credentials)
This should be the email that is subscribed to SNS topics. Here, you’ll need to:
- Set Up a Folder for Bounce Notifications
- Set Up a Folder for Complaint Notifications
- Set Up Unsubscribe Requests
- Only insert a folder if unsubscribe requests are being processed based on a response to an email address (e.g. [email protected])
- The default in this section should be to leave the folder empty
Configure Analytics Tagging Bundle
Configure this to use “Email Category” as the UTM Campaign parameter, and to use “Email Name” as the UTM Content parameter.
Before you do this, however, make sure to check if “MauticAnalyticsTaggingBundle” is bug free.
Keep an eye on this issue for more information: https://github.com/kuzmany/MauticAnalyticsTaggingBundle/issues/11
Email List Management
These steps have less to do with setting up Mautic, but rather are best practices to keep in mind if you’re sending emails to large lists — regardless of if these lists are your own, or if you’re sending on behalf of a client.
Make sure you follow these steps, and you will prevent yourself from getting burned by bad or outdated contact lists down the road.
Always Ask About the Source of a List
Sometimes contact lists are so old we can’t remember where all of the data came from — it’s situations like these where we could run into trouble. If email addresses are out of date, they will likely result in bounces, and a bounce rate above 10 percent may get your account flagged or suspended.
If the list isn’t your own, make sure to ask where it came from.
Process Contact Lists with Neverbounce (or a similar service)
Even if you think you’re in the clear with your list, it never hurts to double and triple check. Services like Neverbounce will process your contact list and tell you which emails are safe to send to, which are risky and which you should definitely not send to.
The service is relatively inexpensive, and is well worth the spend — especially if you’re using lists where the contacts haven’t re-opted in recently.
To make the data from Neverbounce visible in Mautic:
- Add a custom field called “neverbounce_status”
- Map the “email_status” from the Neverbounce CSV export to Mautic.
- Create a segment called “Neverbounce Do Not Send”
- Add all “invalid” and “Unknown” neverbounce_status emails to this segment.
When Importing a CSV Contact List Into Mautic, Do Not Browse
We’ve run into this problem the hard way a number of times — it’s especially painful with large lists.
When you go to import a contact list into Mautic by CSV, you receive a warning:
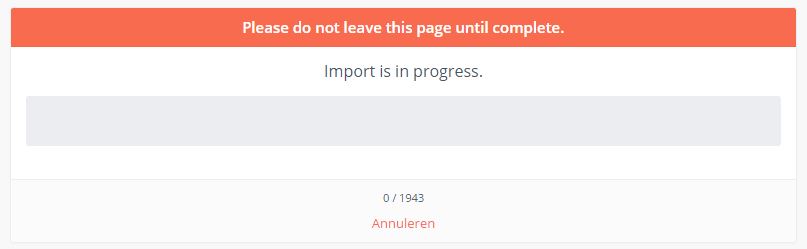
You must heed this warning closely: do not browse Mautic in this tab, in another tab, or let anyone in your Mautic instance browse from their computer. The javascript will break the import transaction, and you will need to restart your import.
Updating Campaigns
Don’t Add New Time-Relative Actions to Enabled Campaigns
Make sure you don't add new time relative actions to a campaign once people in the campaign have reached the first node in the campaign flow.
For instance, if you have a Segment A which pushes people into Segment B in 0 days (immediately), and Segment C in 7 days, adding a new action to add people to Segment D in 5 days after the campaign has already been enabled will not work.
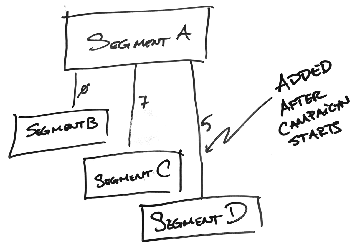
The campaign system builds a queue at the time the previous node in the campaign is hit. It does not go back and re-build the queue to add an intermediary action.
Transactional / Marketing Emails
Append a Lead Identifier to Email Links
This is an important step if you have contacts in your database who were added directly to Mautic. Simply append ?email={contactfield=email|true} to the end of each link in your emails.
Why Is this important? Well this thread in the Mautic forums sums it up nicely. This includes any links in signatures, as well.
?email={contactfield=email|true}(For Plain-Text Emails) Do Not Include a Certain Stylings
Do not include a “margin” styling in the body tag, or a “max-width” styling in the table tag.
This will cause your plain-text email to hug the side of the screen in certain email clients.
Manually Add UTM Tags to All Email Links
With the MauticAnalyticsTaggingBundle currently incompatible with the most recent version of Mautic, you will want to manually add UTM tags to your outbound emails so you can capture campaign data on your Google Analytics site.
The exception here is for email links to external sources. You don’t need to send them unnecessary link tracking data.
To build your UTM codes, you can use Google’s Dev Tool. Or you can set up an Excel or Google Sheet to programmatically generate the UTM code — as we have here.
Pro TIp for Marketers: Insert Your Facebook Tracking Pixel into All Emails
This strategy works really well for those who email large lists every so often, but it’s valuable even for people who just have a regular base of contacts to which they send.
The idea behind it is to build audiences in Facebook you can later use to target with advertising.
Here’s how you do it:
- First, set up your Facebook Pixel in your Facebook Ads Manager, if you don’t already have one built. Here’s a good resource on how to do that for first-timers: Setting Up a Facebook Pixel for Your Business
- Find your pixel tracking code:
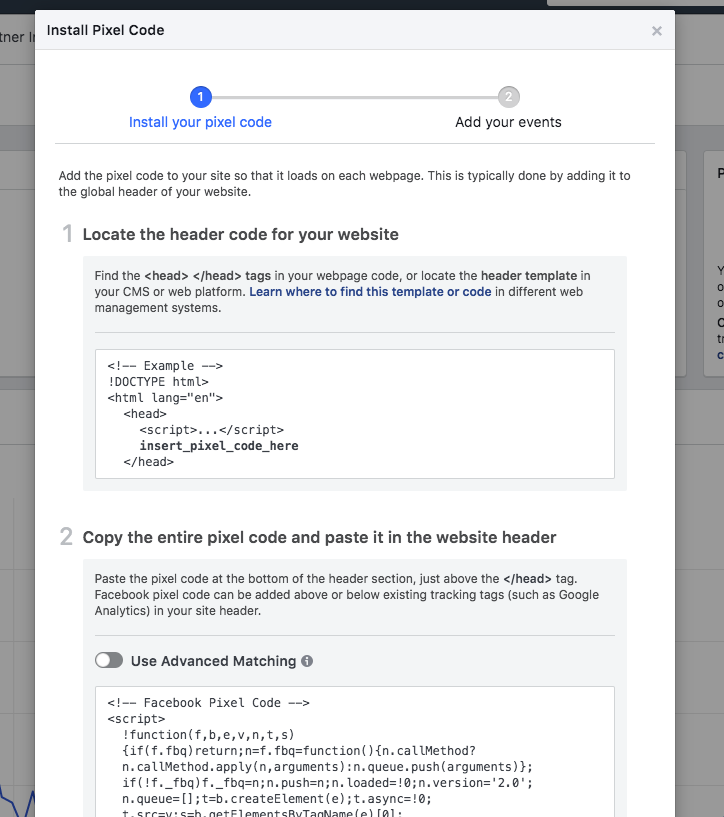
- Copy the pixel code (similar to how you would install it on your site)
- Create an email in Mautic using Code Mode, and go into the Builder
- Paste you FB Pixel Tracking Code in just before the closing </body> tag of your email - this will load the FB Pixel and tag the PageView when someone opens the email.
BONUS: For more controlled tracking, create a custom FB Pixel event for these emails that you can track specifically to build granular audiences in Facebook. If you use the code as you copied it, you will simply count each person who opens the email as a someone who’s viewed the page, but if you use a custom event, you can specifically tag email opens as such, and even categorize them based on type of email.
For example, your custom code could look like this:
<!-- Facebook Pixel Code -->
<script>
!function(f,b,e,v,n,t,s){if(f.fbq)return;n=f.fbq=function(){n.callMethod?
n.callMethod.apply(n,arguments):n.queue.push(arguments)};if(!f._fbq)f._fbq=n;
n.push=n;n.loaded=!0;n.version='2.0';n.queue=[];t=b.createElement(e);t.async=!0;
t.src=v;s=b.getElementsByTagName(e)[0];s.parentNode.insertBefore(t,s)}(window,
document,'script','https://connect.facebook.net/en_US/fbevents.js');
// Insert Your Facebook Pixel ID below.
fbq('init', 'FB_PIXEL_ID');
fbq('track', 'PageView');
fbq('trackCustom', 'emailOpen' {content_category: 'Monthly Newsletter'})
</script>
<!-- Insert Your Facebook Pixel ID below. -->
<noscript><img height="1" width="1" style="display:none"
src="https://www.facebook.com/tr?id=FB_PIXEL_ID&ev=PageView&noscript=1"
/></noscript>
<!-- End Facebook Pixel Code -->
Notice the custom event that has been added to this base code: fbq('trackCustom', 'emailOpen' {content_category: 'Monthly Newsletter'})
After you do this, you’ll be able to build audiences based not only people who opened an email, but people who opened a specific type of email that you send, and you can build lookalike audiences off of those people, as well.
Click “Auto-Generate” for Plain-Text Emails After Each Change
It’s a good idea to set a plain-text version of your emails so people can read them even if images and code aren’t loaded into the email content. Mautic offers a handy “Auto-Generate” feature so you don’t need to re-write every email, however if you click it once and then make a change to the email, it does not automatically update.
Therefore you need to click this option after each and every change. It’s not ideal, but it’s important so contacts don’t see an old version of the email if they opt to read it in plain text.
Trouble with Mautic? We Can Help. Schedule a Free Consultation.
What Mautic Best Practices Have You Found?
This can’t be the “Ultimate Mautic Setup Guide” without input from the community. As with any good open-source project, value is built through collaboration.
Throw ideas in the comments below and we can incorporate them into the guide. Or, if you need some extra help with Mautic, feel free to drop us a line and we can work through it together.